Disclosure: Some posts on this blog are sponsored, meaning that I received goods, services, or monetary payment for my writing. My opinions however, are not 'purchased' and are always 100% my own. Posts contain affiliate links that I earn a commission on. This disclosure is done in accordance with the FTC 10 CFR, Part 255, Guides Concerning the Use of Endorsements and Testimonials in Advertising.

Thursday, September 25, 2014

The #VitaVoxBox: What I got for free from Influenster!

Get Free Stuff

We live in a society where "free" is a code-word for "scam", and yet everyone is always trying to get something for "free".

So does free really exist? Can you ever really get something (good) for "free"? I think the answer is yes - but you definitely need to know where to look! As a blogger, I'm constantly on the lookout for any opportunities that will allow me to review products for free. So far, a site called Influenster is one of the best things I've found that will give the everyday person a shot at getting awesome products in exchange for nothing more than their opinion. (And in this day and age, I don't think anyone is running short on those.)

But are the products any good? Well, I suppose that the depends on the individual, and the particular VoxBox you've received. I've gotten several VoxBoxes since joining with Influenster, and they've all been different, but I've always enjoyed most of the items in each one. Check out what I received in my most-recent VoxBox below, then keep scrolling to the bottom to find out how you can join!

PureLeaf Tea #LoveOfLeaves

I received some PureLeaf Tea to sample, and it was awesome. It was a full-size bottle and the taste was great. I love getting food items in my boxes because it gives me something yummy to drink or munch on while I check out my other products!

#LoveOfLeaves with Pure Leaf Tea via Influenster


Elizabeth Arden #FlawlessFuture Ceramide Serum

Whoa. This one was a surprise to even me! The Elizabeth Arden product line is nothing to sneeze at, and the fact that this serum (found at the beauty counter in department stores) was sample-sized did nothing to dampen my spirits. I would have loved full-sized of course, but the sample was so big that until I saw the full-size one at the beauty counter, I had no idea that I was in possession of a smaller version!

#FlawlessFuture Collection from Elizabeth Arden


SoftLips Cube #GetCubed

This was possibly my favorite item in the whole box. Works amazingly, just as good as the brand of chapstick I've used for years... but it didn't have the same horrible taste as the chapstick I use. (Can you guess which one I probably used? I'm not going to blast them here, but c'mon. We all know which one tastes like awful medicine...) This came full-sized and I've been toting it with me everywhere. I'm gonna need a new one soon, and I'll be able to get it at a discount because they tucked a couple of $1 off coupons in the box for me!!

#GetCubed with SoftLips

Bikini Ready Gummies #BikiniReadyLifestyle

I was a bit confused about this one. It was a sample size (which is no biggie to me) but it is also after Bikini season. (At least where I live. I'm pretty sure if I went out in a bathing suit now, I'd freeze my buns off.) I liked the energy that it gave me - a definite bonus since I've been crunching to work fast against piling deadlines - but I didn't like the taste. It was too bitter for me, and I needed a sip of that PureLeaf Tea afterwards just to get the taste out of my mouth! However, I have to give them points because the caffeine was about what I get from my insta-coffee each day, minus the stains that my daily cup is always trying to leave on my teeth.

#BikiniReadyLifestyle Gummies


First Degree Burn Cream #BurnsHappen

This I could have used all year! My family gets burns on a pretty frequent basis... partially due to clumsiness and partially due to stupidity. (As in a month ago when my husband decided that he was going to make bacon. Naked. Nice job honey.) Needless to say, the hubs and I both have our fair share of cooking burns from working in the kitchen, and I've earned myself a few "badges of honor" from the hair straightener I use on a weekly basis. All in all, this stuff is a definite keeper and handy to have around in the first aid kit.

Alicia Figueroa with First Degree Burn Cream #BurnsHappen


So there you have it. The #VitaVoxBox. It was full of (mostly) stuff that I enjoyed quite a bit. It's simple to get a VoxBox and it's easy to complete the review tasks for Influenster. So why not join up for yourself and see how much fun it is to get one!?

Connect:

You can join Influenster on their website at www.influenster.com. Or, connect with them on social media via Twitter, Facebook, Instagram, Pinterest or YouTube.

Do you ever review products? What do you think of reviewing in exchange for freebies?
Chat with me in the comments below, I love hearing from my readers!

Follow Me on Social Media!

Tuesday, September 23, 2014

Beginner's White Bread Recipe - Easy AND Delicious!!

Easy White Bread Recipe for Beginners

It can appear daunting to tackle a homemade bread recipe if you're not a frequent baker, but this beginner's recipe I found was so simple that I had it memorized within a day!

Not only is it easy, but the bread comes out so fluffy and delicious that you'll be hard-pressed to keep it stocked in your kitchen! We love this bread because it makes great sandwiches and even better toast.

Bread-making isn't an "instant" sort of task, so before you bust out those pans, make sure that you're prepared to give up the time. Take it from me though, it is so, so worth it. It usually takes me about 3 hours (which includes clean-up) from beginning to end to make two loaves of bread. The majority of this is the time it takes for the bread to rise, which means that you can be doing something else (laundry, watching TV, etc.) while this is going on.

My thanks to BreadWorld, which is where I found the original recipe that I based this one off of.

Easy Beginner's White Bread Recipe

Makes 2 Loaves

Ingredients:

  • 5-1/2 cups flour, minimum, on hand (the amount of flour you use will depend on how much it takes to get the dough to the right consistency)
  • 3 tablespoons sugar, plus one teaspoon for yeast-proofing (yeast proofing is the act of testing the yeast to make sure that it is "alive")
  • 2 envelopes of active dry yeast OR 4-1/2 teaspoons active dry yeast, depending on what you have on hand (We buy jarred yeast instead of envelopes since I bake a lot of bread and it's more cost-effective)
  • 2 teaspoons salt
  • 1 cup water, plus an extra 1/2 cup for yeast-proofing
  • 1/2 cup milk
  • 2 tablespoons salted butter, softened to room temperature
  • 2 tablespoons olive oil (for greasing dishes - do NOT add this to your bread!)

You Will Need:

  • One large microwave-safe bowl
  • One small or medium microwave-safe bowl (or a large, glass measuring cup)
  • One (preferably wooden) mixing spoon
  • Two 8-1/2 x 4-1/2 inch loaf pans


Directions:


1. Heat the extra 1/2 cup water for 30 seconds in a large, microwave-safe bowl. (Glass bowls work best.) This will bring the water to the appropriate temperature for the yeast to grow (approximately 100°F - 110°F) and make sure that the bowl retains enough heat to keep the water from going cold too quickly.

2. Mix the yeast and the extra teaspoon of sugar into the bowl (preferably using a wooden spoon), then let sit for about 8 minutes. The yeast should be foamy on top, which means that it is good to use. (This is called yeast-proofing.) If there is no foam, wait another couple of minutes. If nothing occurs, you will have to start over again. If you aren't having luck proofing your yeast, it could be because you are using a metal utensil to stir. Yeast can react oddly to metal, causing it to fail.

How to proof yeast

3. Mix the remaining one cup of water, milk, butter, and sugar in a microwave safe dish. (I use a glass Pyrex measuring cup.) Heat in the microwave for 30 seconds so that it is warm enough that it won't cause failure when you add it to the yeast.

4. Stir the water, milk, butter, & sugar mixture WELL before adding it into the yeast mixture. (You don't want to leave any of that tasty sugar behind!)

5. Add the salt, then begin carefully pouring in flour a few handfuls at a time while stirring.

6. Mix in flour at a steady speed until the dough is soft and only slightly sticky. Do not add more than four cups worth, as this will make your dough taste floury and give it a bad texture. The goal should be to add as little flour as possible, while still having a dough that isn't too sticky to knead. Make sure you are scraping the sides of the bowl so that no ingredients are left behind!

Making Bread Dough

7. Spread a little flour on a clean surface, this is where you will knead your bread. Add small handfuls of flour during the kneading process to keep it from getting sticky on you and to perfect the texture. With this recipe, 7-9 minutes of kneading should be plenty.

Below I've listed a video that demonstrates how-to knead bread. It isn't difficult, although it can be a bit tricky to know when your dough has been kneaded enough. Just remember that a dough that has been kneaded to perfection will be smooth, bubble-free, and feel slightly like pushing on a memory foam topper (it will have a bit of "bounce" to it). Make sure you aren't over-kneading (since that will make the bread tough) or under-kneading (since that will make the bread full of bubbles).


8. Grease a large bowl (I just wash out & use the same bowl I made the dough in) by spreading a tablespoon or so of oil around the inside. Put your freshly-kneaded dough inside (roll once to coat all sides with the oil), cover with a clean kitchen towel, and place the bowl in a warm area. The easiest thing to do is to put the bowl on top of the oven, and heat the oven to about 200°F. (Don't heat the oven higher than this or too much heat may transfer through the top of the oven and start to make your bread dough crusty!)

Preparing Bread Dough

9. Allow your dough to rise for an hour, then (while still in the bowl) punch the dough down. This is exactly what it sounds like - just put your fist right into the dough to let out the air!

Punching Bread Dough

10. Divide your dough in half, then head back to your kneading area (which is hopefully clean again!) so you can make your loaves. Your dough shouldn't stick to the table or your fingers at this point, but if you do find a spot that seems slightly sticky, it is fine to lightly dust that spot with flour so it stops sticking.

11. Spread each half of your dough out into a rectangular shape. For best results, try to make a rectangle that is approximately 12 x 7 inches. I have had rectangles that were bigger (and some that were even not-exactly-rectangle-shaped) and they always turn out just fine, so don't sweat it too much!

Shaping Bread Dough

12. Roll your halves up (beginning at the short end of course), until they look like jelly rolls. Pinch the seam running across the bread and turn the loaf so that the pinched seam is on the bottom.

13. Scoop both ends of your bread under and wiggle slightly. This will make sure that the ends aren't full of little cracks and creases when it's baked. Roll the bread over and pinch together any cracks or open seams you find. (If it doesn't look beautiful, it's no matter - the bread will expand enough during the second period of rising that any uneven pinch lines should disappear anyways!)


14. Grease both loaf pans (don't forget the sides!) and place your freshly-rolled dough loaves inside, seams down. Cover your loaf pans with a towel and return them to the top of the oven so they can stay warm.

15. Allow loaves to rise for 45 minutes.

16. Heat oven to 400°F. (I like to start preheating the oven when my loaves have about 10 minutes left to rise.)

17. Bake loaves in the oven for 25-30 minutes. (Mine usually do well at 28 minutes each, but all ovens vary, so keep an eye on your loaves the first time you bake them and write down which time works best for you.)

18. Remove bread carefully from pans. If you properly greased them, the bread should come right out. If not, a flexible pie scoop works nicely to help ease the bread away from the sides and bottom of the pan.

Bread Baking For Beginners

19. Allow the bread to cool on wire racks, then seal into plastic bags or containers to keep fresh. (This last part is optional of course, my husband and I usually eat about half a loaf of bread while it's still piping hot!)

Enjoy!

Do you have a bread recipe you love? What do you think of this recipe?
Chat with me in the comments below, I love hearing from my readers!

Follow Me on Social Media!

Tuesday, September 16, 2014

Want your youthful looks back? This antioxidant Vitamin C serum from Valentia might be just the thing...

Valentia Even Glow Serum Does It Work?

As I've said before, I can be a skeptic (a big skeptic) when it comes to facial creams & anti-aging serums that claim to help you turn back the clock. Don't get me wrong, I've found a few products that actually do help out a lot, but the majority of the time that a company claims to have a "miracle product", it's actually about as miraculous as a toad on a log.

Because I especially love reviewing beauty products, I was happy to check this Even Glow Serum (which is an antioxidant treatment) from Valentia. I received my product for free through BrandBacker in order to do my review (because no way am I going to pay for everything I review, that would be silly), but as always, my opinions are 100% my own!

The First Day:

I have had a rough month (I've had a lot of rough months lately it seems like), so when I first got this package my skin was looking about as bad as it can get. I've been sick, I've been sleep-deprived, and I've been working myself to the bone day & night. (Okay so maybe not to the bone, but I've lost 20 lbs in the past two weeks, that should tell you something!)

My skin wasn't full of blemishes necessarily, but it was looking a little "peaked" as my grandma would say. Also, I should point out that I turned 30 this year, and I know that it isn't some super-duper old age to become, but I'm suddenly very conscious of the fact that I'm no longer a 20-something with zero wrinkles. I have wrinkles, I have crows' feet (darned crows...), and I'm even getting some weird shading.

Before Photo of Valentia Even Glow Serum Review

Because I know that a little prevention now will go a long way towards keeping these problems from getting worse, I'm trying out all the anti-aging serums and formulas that I can now, when they can do me tons of good! (Trust me, most products work better at prevention than cure, so even if you feel like facial issues are only a little problem for you, now is the time you want to start working on them!)

While Using The Product:

I'll be honest, for the first week or so, I didn't really notice a difference. I hadn't used an antioxidant serum before, so I wasn't sure how long it would take or what to expect. After about a week and a half, my husband stopped me, looked me over, then promptly told me that I looked different. I asked him what was different and he said (no lie here, ladies!), "You look young... and hot!"

I told him that I'd been using this vitamin c serum for my face and even he agreed that the product was most likely to blame for my more youthful appearance. He said that the antioxidant serum made my skin look younger around my eyes and cheeks, especially near the side of my nose.

I started to notice my face becoming more & more even - not something I would have thought about before, or even pinpointed as the reason behind an aging look! I'm very glad that I used this vitamin c serum because it made me realize that even skin-tone has just as much to do with lookin' good as getting rid of wrinkles does! (Also, it smells like oranges. Gotta love a product that smells tasty!)

Valentia Even Glow Serum, User Review By Alicia Figueroa

After Two Weeks:

I could tell you how much better my skin looks, but we all know a picture is worth a thousand words. Below I've included a side-by-side Before & After for comparison. As you can see, the redness in my skin has evened out and my complexion does appear younger. As a matter of fact, I was carded last week at the grocery store, and that hasn't happened in almost a year! (Funny how that starts to be a big deal as you grow older...)

Valentia Even Glow Serum Before & After, Products To Even Skin Tone

As always, I like to remind people who are using a skin product that consistent use is a MUST. You cannot use a product for anti-aging, brightening, softening, smoothing, wrinkle-removing, skin-evening or otherwise, unless you are using it as recommended. The skin is a fickle beast - sporadic application of products will probably mean sporadic results. (Or in some cases, no results.)

Connect:

You can find out more about Valentia on their website at valentiaskincare.com! Want to make a purchase? You can find them on Amazon! I'd love it if you'd use the affiliate link I've listed below since that will enable me to help keep my blog running, and it doesn't cost you anything extra!

Here's the link to buy Valentia's product!: Vitamin C Serum

What did you think of the Before & After photos? What are your biggest facial worries?
Chat with me in the comments, I love hearing from my readers!

Follow Me on Social Media!

Monday, September 15, 2014

DRINK PINK! You can support breast cancer research with mike's hard (PINK) lemonade! #mymikesmoment #sponsored #MC

I participated in an Influencer Activation Program on behalf of Mom Central Consulting for mike's hard lemonade. I received a Circle K gift card to facilitate this review and a promotional item to thank me for participating.

As a mom & wife, I'm a 24/7 multi-tasker. If I watch TV, I'm embroidering during the commercials. If I bake a loaf of bread, I'm cleaning the floor while I wait for the dough to rise. And if I'm taking the kids to the park, I'm going to be reading a book or catching up on email while I'm there!

Sometimes at the end of the day I like to relax with a drink, and it shouldn't come as any surprise that I like my beverages to do double-duty as well! A glass of wine helps the heart, a touch of whiskey is great when my throat is sore, and a drink like mike's hard pink lemonade lets me support Breast Cancer Research with every purchase.

Mike's Hard Pink Lemonade Supports Breast Cancer Research

As the daughter-in-law of a breast cancer survivor, I know that this is a problem that affects families nationwide, so continuous research is important. The company has been making the hard pink lemonade since 2009, and they've donated more than $1 million to breast cancer research since then! The mike's hard pink lemonade is a limited edition, seasonal flavor - so get it now before it's gone!

Last week I made a trip out to my local Circle K to check out some of the weekly deals & grab some mike's.

I found some great savings, like a BOGO deal on Gatorade and a Buy 6, Get the 7th free deal on small snacks. They also had some pretty decently priced gas and I was able to snag some premium fuel for less than $3.80 a gallon!

Great deals at Circle K!

If you have a Circle K near you, you can go to www.CircleK.com to find out the closest location for you to get your own Circle K card and start saving some cash on favorite items.

As for the mike's, I had #mymikesmoment at the end of a long (LONG) day, and it was a great way for me to relax and kick back. (I even let my husband share one with me!) We like the pink lemonade especially well because the flavor is sweet, yet tart.

Connect:

You can check out mike's and everything they have to offer on their website at www.mikeshard.com, or by connecting with them on social media on Twitter or YouTube.

Do you buy certain products during Breast Cancer Awareness Month?
Chat with me in the comments below, I love hearing from my readers!

Follow Me on Social Media!

Friday, September 12, 2014

ALLERGY FACE®? This Look Will Make It Disappear!

I wrote this post as part of my participation in a blog tour for Latina Mom Bloggers on behalf of ZYRTEC® ALLERGY FACE® and received compensation to thank me for taking the time to participate. However, all opinions expressed are my own.

Makeup tips for allergies.

When I was a girl, I was pretty convinced that allergies were something that grown-ups blamed to get out of things like going to the zoo or taking a walk in the park. I didn't suffer from allergies back then, and I thought it would always be that way. Boy was I wrong.

What do you mean "It's Allergies"?!

In my late teens, I got what I thought was a cold. My eyes itched, my nose ran, and I had trouble breathing when I slept at night. That "cold" lasted for six weeks and returned every year. I tried to deny it for a while (how could I have possibly developed allergies?!) but it eventually became so bad that I had to turn to some OTC help to get through the allergy season. (So much for denial.)

I'm not the only one in my family who suffers either - my mom & dad, my younger brothers & sisters, grandparents & cousins... One thing that has definitely gotten us through the fall months (when the ragweed decides to try to kill us) has been ZYRTEC®. And that's no plug, that's the truth! As a matter of fact, when I mentioned this post to my mom, her words were: "Perfect! We use ZYRTEC® all the time!" (Actually she didn't put that ® symbol in her sentence, but you get the picture.)

Red Nose & Puffy Eyes? Not the best time for a picture...

As someone who now is all over the internet (photo-wise), I get pretty nervous whenever I know I need to do a post and I'm looking like a big sack-o-blah. A runny nose & itchy eyes aren't exactly what I want my readers to zero in on when they visit my site, so I was thrilled when I saw that celebrity makeup artist Jackie Gomez was working with ZYRTEC® on some awesome ways to combat the annual ALLERGY FACE® problem!

I love that ZYRTEC® is sensitive to the fact that allergies don't just affect how you feel, but also the way that you look! And because I especially love a makeup tutorial (it's an excuse to make myself purty), I decided to share a step-by-step on one of the looks with you all!

And now for the tutorial!

The look I decided to go for is "Fresh-Faced & Glamorous", which helps out when your allergies are causing watery eyes or irritated skin (two problems I face frequently during the ragweed season). Below is a picture of me looking downright icky.

Makeup tips for watery eyes caused by allergies

Jackie recommended using a lightweight concealer to cover flaws. This gives my facial skin a break from wearing anything too heavy but still allows me to cover up any blemishes. In the photo below I'm using SheerCover concealer, a product I did a review on recently.

Concealer to help hide allergies

Next, Jackie suggests a soft taupe color for the eyes because of its great ability to be an "everyday" color. I applied the eye shadow in the crease of my eye & the upper eyelid area, all the way out to the corners. I made sure not to get any eye shadow on my lower lashes or the bottom of my eye so that I didn't cause my peepers any extra irritation.

(Don't have a taupe shadow? You can mix an off-white with a dark brown to achieve the right blend.)

After I applied my eye shadow I added some water-proof mascara. Jackie's suggestions say to use three coats, which will help the curl of your lash stay up and away from your sensitive eyes all day long.

Using eyeshadow to hide allergies

Next I did my cheeks! The directions in this look say to add blush on the apple of the cheeks for a face-brightening pop of color. I used my favorite AVON Color Confetti Blush with Peach Flecks.

Using blush to hide allergies

Lastly, a bright pink lipstick finishes off the look, detracting from my eyes and making me stand out in a good way! As soon as I heard the words "bright pink" I knew I had just the thing, thanks to my recent review of One Direction's new makeup line. The color, "I Should Have Kissed You", is a definite head turner and really brought this look together.

Lipstick to hide allergies

After I had put my look together, I ended up with this! These tips from Jackie Gomez were great, and I couldn't be happier with the results. You'd never guess that I was suffering from allergies in this photo, and with the easy-breezy application, this is something I'll be able to do everyday!

Hiding allergies with makeup


Some ZYRTEC® Facts!


  • ZYRTEC® Dissolve Tabs can be taken anywhere! They dissolve in your mouth without water and provide relief for 24-hours. These are great for people who are on-the-go.
  • ZYRTEC® (cetirizine HCI) is the number one allergist recommended brand of OTC oral antihistamine products!
  • ZYRTEC® helps relieve allergy symptoms like sneezing, runny nose, itchy, watery eyes and itchy nose or throat. Symptoms can be caused by allergy triggers like dust, mold, pet dander, tree pollen, weeds and grasses.
  • ZYRTEC® starts working at hour one on the first day you take it and provides 24-hour relief.

Connect!

Want to know more about ZYRTEC®? You can find their website at www.zyrtec.com! Or, find them in social media on Facebook & YouTube! (They have some great tips on their YouTube vids, I highly suggest you check them out!)

What do you think of this look? Do you suffer from allergies?
Chat with me in the comments below, I love hearing from my readers!

Follow Me on Social Media!

Monday, September 8, 2014

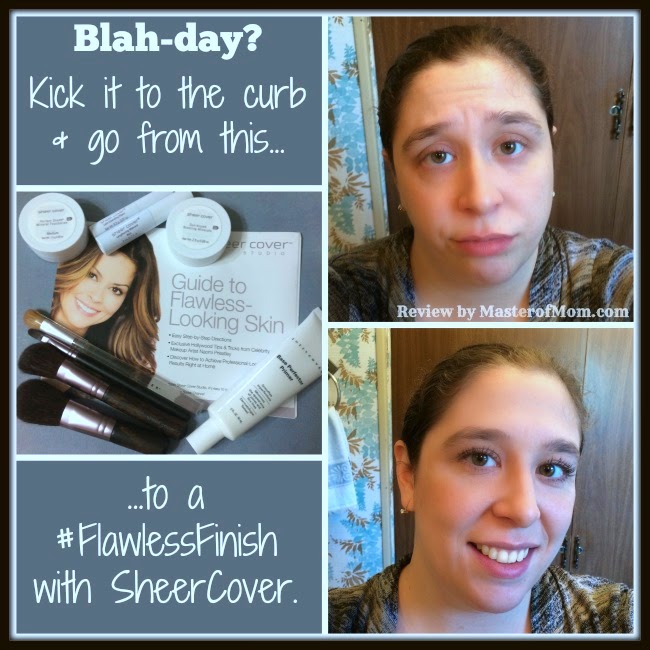
Make Your Face Flawless With SheerCover!

SheerCover Studio Review by Alicia Figueroa

There are some days I wake up and wonder what on earth is going on with my face.

Although my skin is usually quite naturally flawless, when I finally do break out, it isn't pretty. Lately my problem hasn't been break-outs so much as just all-around facial-blah.

Between moving across the country & back to my hometown, being sick, having hay fever and spending countless hours jumping up at night to check on my equally sick-and-snotty babies... my skin has decided to take a vacation. (And by that I mean I look like a hot mess.)

So my options seemed pretty simple: Either hide in my house all day to avoid being seen by everyone (because this town is the size of a gnat's hat and I haven't been to a single place without running into someone I know) OR, find a way to hide my facial flaws until my skin decides that it's okay to come out and play.

Luckily for me, I had been sent a SheerCover make-up kit through my connections with ModernMom. I got the kit for free in order to do the review, but my opinions are still my own (as always!)

My sickest apologies...

This was totally going to be a video review, but over the course of the day my voice has been getting continuously hoarser. Although I'm not a raging mess of sickness anymore, I didn't think anyone wanted to hear me try to squeak out random sentences in a YouTube video, so this is gonna be one of them old-fashioned picture tutorials instead.

So let's begin!

Ooo, Instructions!

First off, the kit I was sent from SheerCover Studio comes with a handy-dandy booklet that is pretty much like a road-map to making your face blemish/redness/splotchy-free. This was especially appreciated by me, not just because I can be ever-so-slightly blonde when I'm trying out a new product, but because when I'm sick my brain no like to think thoughts. Instructions = Good.

(Side note: I just discovered that when your voice is this hoarse it is I-M-P-O-S-S-I-B-L-E to holler at your husband to do anything. #NaggingWifeFail)

Look Away! It's Medusa!

Okay, so it's not that bad, but here is a picture of me (a HORRIBLE picture of me, mind you) looking like I'm about to give up on the day.

No makeup picture

Time to be boo-ti-ful.

Once I opened up the kit, it was pretty easy to tell what was what. You have your primer base (which for some reason reminded me of an adhesive), a trio concealer (two shades plus a brightener), mineral foundation (blends great!), and a triple-shade bronzer palette. To top it off was a mascara & fiber combo meant to make your lashes as long & full as possible.

Sheer Cover Studio Review by Master of Mom

The Primer

After putting the primer on, I'll be honest, I wanted to immediately wash it off. It felt like something that might clog my pores and yet, as I rubbed it on, I was stunned by the lightness of it. I'll update this post if a break-out occurs, but so far, so good! I think that in a way, the primer is meant to be a sort of adhesive - it's not sticky by any means, but I felt like it was something that the powders of the foundation would naturally cling to.

Sheer Cover Studio Primer

The Trio-Concealer

I didn't have as much luck with this as I thought I would, but I think that has a bit more to do with my make-up brush skills than anything else. I tend to use my fingers for blend-type applications, so I'm still an amateur when it comes to blending with a brush. (You could say I need to 'brush up' on my skills. Heh. You see what I did there?) I could tell that the brightener still helped to hide my under-eye circles, and the concealer worked great to hide a problem area on my chin.

Sheer Cover Studio Trio-Concealer

The Foundation

This stuff was awesome! I loved how smooth and clean it brushed onto my skin, and I was right - the primer really did help the foundation to stay in place. One of the biggest reasons I tend to avoid powder make-up is that I feel like it practically falls off my face (and makes a huge mess) whenever I apply it. I was super-impressed with the fact that whatever I applied on my face, stayed on my face.

Sheer Cover Studio Mineral Foundation

The Bronzer

You would think that because I just moved here from Florida, I would already look a little sun-kissed... but for whatever reason my complexion refuses to get tan. I don't burn, I don't get dark, I just stay pale all year long. Maybe my skin failed color-changing class. (Lucky for me I'm not a chameleon.) Either way, I loved how my skin suddenly had one of those rosy-perfect glows that women get when they've been in the sun for just the right amount of time.

Sheer Cover Studio Bronzer

The Mascara & Fibers

Oh. My. Goodness. This was amazing. My lashes are already long, but I have noticed that they are starting to get just a teensy bit thinner. I have never seen anything so cool as the little fibers that come in this lash-lengthening combo! Just apply the mascara, then the fibers, then the mascara again and poof you have gorgeous-long & thick lashes.

Sheer Cover Studio Mascara & Fibers

The End Result:

I think I look supah-fly. (Are people still saying that? Probably not.) I can't tell from this pic that I'm under-the-weather, or that my face started out as a big ball of blah. I think I'll wear this fab-look out to the store in a bit, for the star-studded tasks of grabbing throat lozenges, orange juice, and the biggest bucket of ice cream I can find.

Alicia Figueroa wearing Sheer Cover Studio Makeup

Bonus:

I know we all are concerned about ingredients these days, so I consider it a definite plus that these products are non-comedogenic with no preservatives, no fillers and no chemicals!

Do you want to look awesome?

(Just say yes, you know you do.) Then guess what!? You too can own some SheerCover Studio Make-up. (And because you aren't me, you'll probably look even better when you wear it!) You can grab some of your own by heading over to www.sheercover.com and checking out what they have to offer.

Connect:

You can also find SheerCover on social media to stay up-to-date on product info & special deals through Facebook, Pinterest, YouTube, or Twitter.

Have you heard of SheerCover? What do you use when you have a case of the-blahs?
Chat with me in the comments below, I love hearing from my readers!

Follow Me on Social Media!

Friday, August 29, 2014

Zero Calorie Soda with NO artificial sweeteners? It's possible... but does it taste good?

Zevia Taste Test and Review

Soda is full of calories (thanks to sugar), but the usual chemical alternatives (aspartame for instance) are usually linked to diseases such as cancer. And "all-natural" alternatives are often presumed to taste bad.

Do they though? We put four kids & a mom to the test with Zevia sodas (made with stevia as a sweetener) to find out!

I received this product for free from the sponsor of the Moms Meet™ program, May Media Group LLC, who received it directly from the manufacturer. As a Moms Meet™ blogger, I agree to use this product and post my opinion on my blog. My opinions do not necessarily reflect the opinions of May Media Group LLC or the manufacturer of this product.


A Few Zevia Facts!

  • Zevia is sweetened naturally with a blend of high-purity Stevia (grown in the US!) and Monk Fruit.
  • Zevia comes in 15 different flavors so everyone can get their favorite!
  • Zevia contains no calories, sugar or artificial sweeteners.
  • Zevia is kosher, vegan and gluten-free.
  • Zevia retails in a 6-pack for anywhere between $3.99 and $5.99.

Our Testers:

In addition to our mom-tester (gotta have mom's stamp of approval, right?) we enlisted four volunteers (two boys and two girls) between the ages of 4 & 12 to test out the Zevia soda. "L" is an 9-year-old girl; "N" is a 12-year-old girl; "B" is a 4-year-old boy; "J" is a 7-year-old boy. And our mom tester says she's been "21" for the past decade. Check out the test results & commentary below!

Zevia Root Beer

"L" & our mom tester both thought the same: "The first taste is good, but the aftertaste isn't."
"N" says: "It's good, but I don't like the aftertaste.
"J" & "B" both think it tastes good all-around.
Percent of our testers that would drink the Zevia Root Beer again? 100%

Zevia Cola

"L" & "N" agreed: "The first taste is just like Pepsi, but the aftertaste is like off-brand cola."
Our mom tester, "J", and "B" all liked the cola flavor and agreed it was better than the root beer.
Percent of our testers that would drink the Zevia Cola again? 100%

Dr. Zevia

"L" says: "It tastes like really healthy strawberry soda.
"N": "It tastes like candy."
"J": "I think it tastes like cherries."
Our mom tester and "B" both liked it. Everyone agreed it was better than the root beer and cola flavor.
Percent of our testers that would drink the Dr. Zevia again? 100%

Dr. Zevia, Zevia Cola, Zevia Ginger Root Beer

Zevia Cream Soda

"L": "Aftertaste is medicine-y."
"N": "Really good at the start but the aftertaste is bitter."
"J": "I think it tastes like fizzy root beer."
Our mom tester: "After the kids said it was a bitter, I thought I wouldn't like it, but I think it tastes pretty good!"
"B" sat the rest of the tests out after this one because his tiny tummy had about as much carbonation as it could take for the afternoon!
Percent of our testers that would drink the Zevia Cream Soda again? 50%

Zevia Black Cherry

"L": "Smells good, but tastes bad. I thought this would be my favorite."
"N": "Definitely better than the cream soda, this is my favorite so far."
"J": "I love it!"
Our mom tester: "It's better than I thought it would be."
Percent of our testers that would drink the Zevia Black Cherry again? 75%

Mountain Zevia

"L": "Tastes like sweet kiwis, but I don't like kiwis."
"N": "Tastes like citrus water. I think people who like citrus would like this, but I don't like citrus."
"J": "I love it!"
Our mom tester: "The taste is okay, but it doesn't smell very good!"
Percent of our testers that would drink the Mountain Zevia again? 25%

Caffeine Free Zevia Cola

"L": "I wouldn't drink this again."
"N": "It's not my favorite, but I like it better than Mountain Zevia."
"J": "I like it but it isn't my favorite either."
Our mom tester: "I don't care for it. It's missing something."
Percent of our testers that would drink the Caffeine Free Zevia Cola again? 25%

Caffeine Free Zevia Cola, Mountain Zevia, Zevia Black Cherry, Zevia Cream Soda

Zevia Orange

"N": "It has a bad aftertaste but I love it on the first taste."
"L": "It's good, but it has a bitter aftertaste."
"J": "Hey! I like this one a lot!"
Our mom tester: "It's a bit too bitter for me."
Percent of our testers that would drink the Zevia Orange again? 25%

Zevia Lemon Lime

"L": "It's just okay."
"N": "Starts good, but ends bad."
"J": "I love this one too!"
Our mom tester: "This one is just okay."
Percent of our testers that would drink the Zevia Lemon Lime again? 50%

Zevia Grape

"N": "This is surprisingly good! It tastes like the regular [name-brand] grape soda."
"L": "Smells like grape candy and tastes similar."
"J": "I love it, this flavor is very awesome."
Our mom tester: "This one is good!"
Percent of our testers that would drink the Zevia Grape again? 100%

Zevia Gingerale

"L": "Yuck!"
"N": "It's good!"
"J": "Totally awesome!"
Our mom tester: "This is pretty good gingerale!"
Percent of our testers that would drink the Zevia Gingerale again? 75%


Zevia Ginger Ale, Zevia Lemon Lime Twist, Zevia Grape, Zevia Orange

Zevia Grapefruit

"L": "What? This is the best one!"
"N": "I don't like grapefruit, but I like this!"
"J": "This was definitely the very best one."
Our mom tester: "Wow, this is surprising. I didn't think I would like this flavor, but this turns out to be the best of all!"
Percent of our testers that would drink the Zevia Grapefruit again? 100%

Our Mom Tester Sums It Up:

"I think that in an ideal situation, this is the type of beverage that is perfect for someone who already has cut sugar out of their regular eating habits for dietary reasons or otherwise. After you get bit by the sugar-bug, it's hard to let go! I noticed that "J" had an easier time accepting all the sodas, and I think it's because he hasn't been given many sweet sodas in his lifetime. While I'm not certain how completely I trust the stevia ingredient at this point, I know that it's a lot better than aspartame. This is definitely one to think on, and I'm going to share this with my diabetic friends for sure - this would be a game-changer for them. It's also nice to know that if I decide to do a low-carb diet again, this will be here waiting for me. I got so sick of drinking "just water" last time I dieted!"

Connect:

Are you curious about Zevia's line of sodas? Find them on their website at www.Zevia.com. You can also find them on social media via Facebook, Twitter, YouTube, Pinterest, or Instagram.

Have you ever tried a product with stevia? If so, what did you think of it?
Chat with me in the comments below, I love hearing from my readers!

Follow Me on Social Media!